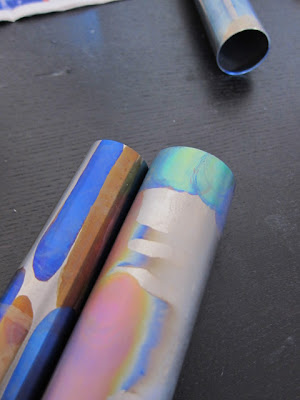
Anodizing experiment 2. I got used to it. I got something tip. Blue is easy to be anodized and emerald green is showed at over 100V. One of the important things is that the surface has to be finished (clean).( Everything is showed after anodizing.)
Anodizing is a good method to put colors on Ti but it takes time and need a careful work. This method may be good for small shops to do it. (Anodizing may not be a good way for high-volume productions.) I think this method should be a more popular way for Ti bikes and I hope small shops which make Ti bikes try this method more and more.
Anodizing, polishing, brushing, and blasting... We can make great apperences with using these four methods. This is a good example many people already know. (http://www.flickr.com/photos/fireflybicycles/8395631576/in/set-72157632556982071/)
アナダイズの実験2。少しづつ慣れてきた。ブルー系の色は比較的出しやすいようである。グリーンは100V を越えて現れる。重要事項としては事前にチューブの表面はきれいに仕上げられていないといけない。アナダイズをした後、チューブの表面の状態があらわになる。
この方法はチタンというペイントを必要としないものに色をつけるにはうってつけの方法であるが、時間が少しかかるのとケアフルワークを必要とするので、ハイボリュームなマニュファクチャラーでは採用しづらいと思う。(プロダクションタイムやレイバーコストなどを考えるとペイント並にアップチャージをしないと採算がとれないだろうから)
しかしもっとこの方法がポピュラーになってほしい(チタンバイクを製作するスモールショップなどで)と思うし、もっとトライしてみてほしい。
アナダイズド、ポリッシュド、ブラッシュド、ブラスト。。。この4つの手法を上手く使うことによって素晴らしい表装をつくることができる。
これは一つの例(http://www.flickr.com/photos/fireflybicycles/8395631576/in/set-72157632556982071/)


No comments:
Post a Comment